No Sew 4th of July Shirts

We had to have a dramatic before picture.

 The finished product.

 We are ready to celebrate the 4th of July! All stocked up on cotton candy and glow in the dark paraphernalia.

If you want to make your own, I didn't take pictures in the process, but here's the explanation.

Lay a tank top down on the large white t-shirt and cut around the edge leaving about an extra 4" on the sides to make ties and cut the straps about 4-5" longer too.  You'll have 2 pieces and while they are still laying on top of each other cut strips horizontally, about 1 1/2" thick, from the arm hole to the bottom.

I put the shirt on the girl first and then tied the sides in knots.  Do the same for the straps.

To paint them I used this genius idea I read on Pinterest forever ago.  Use any spray bottle (I used a cleaned out detangler bottle) and put some acrylic paint and water in it.  Shake well and spray.  It doesn't get stiff like real spray paint, isn't expensive like fabric spray paint, and I'm pretty sure won't wash out...this has yet to be tested.

For stars and stripes you can use tape or I just held 2 pieces of cardboard and sprayed and moved them down as I went.  I cut out the stars from a couple old sticky name tags, but you could use tape or buy star stickers.  I told them we were going for a "vintage" style...meaning they're not perfect.

They love them, I love them, Daddy loves that I didn't make him or brother one.

Have a safe and Happy 4th everyone!!!

DIY Cleaning Supplies

I have seen so many different recipes for making your own laundry soap, so I knew eventually I would make some, but couldn't decide which one.

I think I went with this one because the lady said she was picky about her laundry soap and this lived up to expectations.  Now, I do have to say I'm not at all like that lady.  I buy THE cheapest laundry soap Wal-Mart has.  So I probably actually ended up with better soap than I've ever had, and for cheaper.  Nice.
This is where I got the recipe.

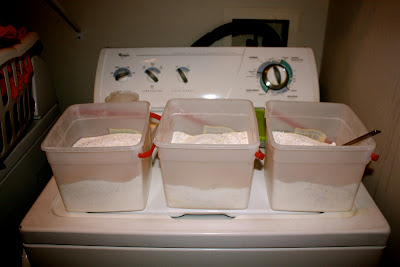
I didn't want to mix in a 5 gallon bucket, so I used these old ice cream buckets.  If I would have thought of it, I would've just put the lids on and shook them instead of stirring.  One word of advice when mixing this, do it somewhere that you don't want the powder to poof out everywhere.  I'll do it in my garage next time.
The crystals container really does make a great container because you can measure it in the lid.


I've also seen a ton of different recipes for homemade wipes.  Had to make some of those.  I think I just ended up using the Glass Cleaner Wipes recipe for both of my buckets though.  Since it has rubbing alcohol and vinegar, I figure they're going to disinfect pretty well.

This is where I got the wipes recipe.
 Do you like how many of these ice cream buckets I have?!  I get one for about every birthday party and obviously keep them.  They work perfect!  And my husband always makes fun of me for keeping them. Ha!
 These are great for the bathroom where my little ones can help out with the cleanup.

Now this next one was SO simple.  I hated buying the refills for my Swiffer, so stinkin' expensive.  Then I saw on Pinterest how you can stick the end of one of those refills in boiling water and then twist it off and refill it.  Amazing!
I refilled it with about 1/3 vinegar and the rest water.

I have quite a few other things along this line that I'm looking forward to making...like dryer sheets and napkins.  I don't know why all of a sudden I'm on this kick, but it's a productive one at least.

Stuffed Animal Cage

One of the messiest places in our home has to be this little space.
 You would think I made the closet look like this for a good before picture, but actually this is what it ends up looking like at least once a week.

It's absolutely ridiculous.  I have organized and reorganized this closet, but nothing seems to help a 5 and 3 year old keep it clean.

On another one of those days trying to tame the mess, I decided we needed something for stuffed animals.  I searched online to see all of the different ideas out there, but nothing was working for me. 

I didn't want my husband to have to build something...or this would have worked.
I don't have a corner to hang a stuffed animal hammock and needed my wall space...or this would have worked.

And I didn't want anymore space in their bedroom floor taken up...or this would have worked.
Then it hit me!  I just got a new vacuum and had this big box in my garage.  So I thought I would make it into a stuffed animal cage.

Here's how I did it.

I cut the top box flaps off and taped the bottom well.  Then I cut a large opening on one side.  If doing it again, I would probably make the opening a little smaller to make it sturdier.  You just need enough space to get the animals through.
Then I grabbed some leftover fabric (that just so happens to match their room), and wrapped it around the box and hot glued it in place.

I used 1/2" wide elastic for the 4 "bars."  I hot glued one end and stretched it a little and hot glued the other end.  I went back and also stapled each end of the elastic.
You could always add more elastic bars if the stuffed animals don't stay in like you want them to.
It has been working great.
Now they know where they're supposed to go at least.
We can also see the floor in the closet more often now.  It helps to have a garage sale too.
I didn't take a picture, but I also added nails (which will be changed to hooks) to the wall right inside to the right, for all of their purses and bags.  

I feel like we're a little more organized in here now.

Some Before & Afters

Here are some projects I've done that were simple transformations.

I found these frames at a garage sale for $1 each. I was ecstatic to get such a great price since they are really huge nice frames with a matte.
I used one in my living room with our family picture. I spray painted the frame black and the matte white. Turned out just like I wanted.
I also got a 16"x20" picture for free from Shutterfly. Some coupon for $20 that came with my girls' school pictures (that I didn't even buy). A huge picture and frame and the whole thing was a buck. Can't beat it!

The other large frame went in my bedroom. A honeymoon picture, when we wore matching clothes.

Love it...don't think we've done that since our honeymoon. You know, where every honeymooning couple in Hawaii is wearing their matching silky, floral patterned outfits.

I think this table is actually a plant stand, but it was the perfect size for the little corner in my entryway.
  

It had rings on the top and looked pretty rough, but nothing spray paint can't fix.

I was kind of concerned about how the top would turn out, but by just covering up the rings it works fine.  When you put stuff on top of it you don't really notice the paint since you can still see most of the marble top.
I really liked it until my toddling 8 month old decided to pull it over.  Very thankful it didn't hurt him, but moved it for now.

This was some random wall decoration that my Mom brought me. 
If you can see it amongst the mess it's laying on.  I had already started painting the left side.
 It was sitting in my garage sale pile because I didn't want it either, then it hit me.

I have been needing a Christmas card holder and thought this might work.

I spray painted the whole thing green and the flowers red.  Let me tell you, this thing was pretty ugly even spray painted...or just not my style.
 I also spray painted about 30 clothespins green.  I think you could skip this step, but I wanted them to really blend in.  I cut little strips of scrapbook paper I had and used Mod Podge to adhere them to the tops of the clothespins.
 This is what it looked like with my old Christmas cards on it, because I had to test it out before I ever got Christmas cards coming in this year.
 When I got cards this year, this was perfect.  I could even use the clothespins for multiple cards.
I like that we can see them all throughout Christmas time.
I love that people still actually send out cards!

One last makeover.
I found a couple of these sconces at Goodwill for about a dollar.
Gave them a couple coats of black glossy spray paint and now they hang on my wall.
 Not really sure what to do with them...but there they are for now.

Canvas Pictures

I can't remember how long I've been wanting to do these with my kids' pictures, but I finally did it.
One reason it took so long was because I needed some good pictures. I took some when we did family pics this Fall and really love them.

If you want to make your own, this is what you will need:

Canvases
Black paint (I used acrylic)
Pictures
Mod Podge - glossy

About the canvases...I used the 2 inch thick ones because that's what I like, but used the thinner ones for a set for the in laws. Both look nice, just depends on what you like. You can usually find canvases for at least 50% off at Michael's. I happened to get mine for 70% off during the holiday one day deals. You just want to make sure to get the canvases that are wrapped all the way around the edges and stapled on the back and not the sides. Try to get the canvas the same size as your pictures or maybe a little smaller.

I printed my 5x7 pictures at Sam's for 38 cents each.

I actually used real Mod Podge for these, since I wanted them to be nice. Usually I would use the homemade version of Mod Podge for things, but lately people have said on certain things it turns out looking milky on their projects. Of course I used my coupon and bought it for 40 or 50% off at Joanns.

Now on to how to make them. I painted all of the sides of my canvases and a little up and over the edge onto the front. This way if your picture isn't quite perfect, you won't really be able to tell. I ended up doing two coats.
While that dries you can trim your pictures to fit the canvas if you need to. Not all canvases are created equal so you may want to lay your picture down and check on every one.

Once the paint is dry, put a coat of Mod Podge on your canvas and then lay your picture on top. I went ahead and then did a coat on top of the picture also. Let that dry and then do another coat. I brushed the first coat vertical and the second horizontal.
 
I took this picture so you can see the texture a little bit.  It kind of gives it that canvas look on top of the picture. I also went ahead and put a thin coat around the edges since some had gotten on them. It was glossy Mod Podge so you could see on the sides where it didn't have any.

In the end I probably spent about $3 for each one, which includes the price of Mod Podge that I'll use for many more projects.

I really love how these turned out. Have fun making your own!
Related Posts Plugin for WordPress, Blogger...