Christmas Plaques

Disclaimer: If you are my sister-in-laws...please don't look at this post, unless you don't care to be surprised. :)

I've seen these plain wooden plaques hanging at the Dollar Tree for some time now. Many different ideas ran through my head...baby's room w/letters, big girls room with patterns, dining room...so many options.

Instead I thought I should send 2 of my brothers and their families a little something for Christmas. This will be the first Christmas I've ever had without my family...tear. But it'll be ok.
I spray painted the whole thing red. Then took Christmas scrapbook paper and Mod Podged it on. Used my Cricut to cut out the letters and Mod Podged them on top. Hot glued some little rhinestones, bells, and ribbon and that's about it. It actually took longer than I had planned, but that was probably because I was crafting with a group of ladies. Talking accounts for the majority of the time I would guess.I figure I can get away with making them home decor since it's seasonal. They don't have to keep it up if they don't like them. But I think I may make myself one now.

Jewelry Boxes with Mod Podge

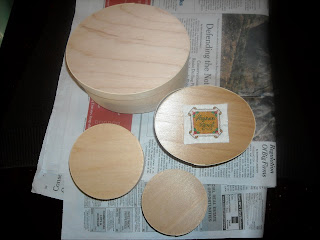
I finally finished my little girls' jewelry boxes. They are the little wooden boxes I found at the Thrift Store for 75 cents. I had to show the top of this one. It had a small cross-stitched something or another Mod Podged on top. I found out you shouldn't Mod Podge unless you are serious about it staying there. I had to use plyers to rip it off!
First I spray painted them black. Then I Mod Podged zebra print scrap paper to the top. Then cut out letters and swirly thingies on my Cricut (love it! will have to share the story of how I got a great deal on it later) and Mod Podged them on.
Not that you can see, but I also lined the inside bottoms with hot pink felt.
Voila! I'm planning on stacking them up and setting them on their bookshelf or dresser...where little hands can't destroy them.
I even made jewelry to go in them, but didn't take a picture. I can't wait for them to open them! I hope they like everything as much as I do.

Ornament Wreath-w/some tips


I'm linking up to The DIY Show Off today.
The DIY Show Off
I know there will be so many great ideas.

I have seen these everywhere! They all are different and look so pretty.
Every year at the after Christmas sales I usually buy the cheapo ornaments. So I knew I would have some when I pulled out all the decor this year. So exciting!

So I took these...and this...and some of this...and of course my hot glue gun and it came out like this...
Just a few tips (that everyone might already know, and I was just being a little dense about):
*You DO need to hot glue the tops on the ornaments...

*But you don't have to loosen them off and put glue around the stem and then press them back in. Instead, just smudge the glue around the top. This takes a lot less time and mine have held up just fine.

*Use a thin hanger or something that bends easily but still holds shape...mine was sooo stiff when trying to finish it at the top!

*It really doesn't matter the order you put them on the hanger. I was all strategic with it and in the end you can move them around and really organize them pretty easily.

And this project does take about 80 or more ornaments. I actually wish I had more than what I did. I had to use old and new ones, small and large, but I still like how it turned out. Next time I would like to use all small ones in 3 colors. Maybe I'll save that for next year.

Painted Wooden Letters

Hope everyone's Thanksgiving was GREAT!
I'll have to post some pics later of the 1st Thanksgiving meal I've ever done by myself.
For now, something crafty.

I've been adding a few things to the baby's room. My baby girl is due Feb. 6 and I can hardly wait to meet her!

Since I already have 2 girls, the baby's room isn't changing much at all. I made all of the bedding and trimmings for my first little girl, and I just haven't ever thought I needed to change it when I'm still having girls. But I do like to add a little something different for each one.

I have always had their name in the room somewhere, so I painted some thin wooden letters to match the bedding. I think I will hang them on the wall somewhere.
I still have a couple of projects left to do in her room, but hopefully I have enough time to do it.

Say Hello!

I would love to hear from you...especially if I don't know you personally. Fabulous K started this today...
Being new to this whole creative blog thing, it's nice to just get a big "Hi!" or "Howdy!" or whatever works for you. And thank you to those that have left sweet comments in the past. It sure makes me smile. :)

My 1st Mod Podge Project

I couldn't figure out what to do with these. The part with the peppers is a glass and I think you could use them for pretty pot holders on your table. I never did, but that's just b/c I probably never thought of them while they were hanging on my wall.This is the only picture I can find of them as they were before (even though I know I have a better one). I changed my kitchen/dining area theme from peppers to an Italy/European type of decor.
So this is what I came up with. I think my friend may have mentioned it actually. I found some beautiful scrapbook paper at Michael's and Mod Podged them on top of the peppers. Worked wonders!
I love them!
I just started another Mod Podge Project. I found these at the Thrift Store all for 75 cents. This is the before...I'm turning them into little jewelry boxes for my girls for Christmas.
Stay tuned for the finished product...which is hopefully before Christmas.

Sweater Dresses

So, a couple weeks ago I started cutting up the turtleneck on one of my old sweaters and had a thought..."this would make such a cute little girls dress, maybe I shouldn't cut the neck off." I didn't listen to that thought and cut away.

2 days later I saw this adorable dress that Make It and Love It showed how to do and that gave me the little push I needed to actually make the dress.

I took my old sweater...with neck cut off,
and one of my hubbie's old sweaters
and they turned out like this...
I left them a little long, but you could always make them whatever length you want. I also added ruffles to the neck and sleeves on the one that I had chopped off the neck. And ruffles on the brown one for two reasons 1) I had to cover up the little green logo that ended up under the armpit and 2) my 4 year old looked a little like a Bible character with the long brown robe like thing going on.

Mod Podge Dresser Knobs

I have a new love...Mod Podge. This is my second little project with it. I'll post the first one, that I LOVE, when I get some batteries for my camera...it seems rechargeable batteries can only recharge so many times.

Back to the dresser. Still redoing my girls' room and had bought this dresser off of Craigslist and knew the knobs would have to change. This is the before, I realized I needed to take a picture after I had half the knobs off...oops.I took the knobs off, painted them hot pink and then Mod Podged small zebra scrapbook circles on top. I used a few coats to make sure they stayed since they would be handled a lot. I really like how they turned out.I have another project in the works with more Mod Podge! I'm loving this stuff right now. And it sure beats what I would have done otherwise, which is hand paint zebra stripes.

Corkboard Redo

I found this corkboard at the Thrift Store for $1.98. I took this picture after I took the frame off of it, but you get the point that it's just a normal old corkboard...with a few rough spots.I covered the corkboard with pink fabric and hot glued it on the back. Spray painted the frame black and put it back on the board. I think I even attached it back on with hot glue because it just needed a little hold to make it stick back around it.
I had so many different ideas for this board, but that always seems to change in the midst of doing my projects, go figure.

I ended up using bottle caps (& no I'm not drinking while I'm 6 months pregnant),
covering them with a little circle of zebra fabric, with hot glue of course, and then using hot glue again to attach a push pin to the back. Works great! I think I may add some zebra fabric flowers on the tops of some just for fun. But for now, I like that my girls have a place to display their artwork. It used to be taped to my bedroom door every morning. Not that that wasn't sweet, but now they can keep it up longer.

What To Do With Broken Crayons

I have seen this idea on so many different websites and blogs, so I don't know who to give credit to. So I guess nobody gets it...sorry.

I had fun doing this with my girls. They thought it was pretty neat too.

We had sooo many broken crayons because both of my girls have gone through seasons where they thought it was fun to see how many they could snap in half before I grabbed them away.
The worst part is getting all of the paper off...uggh. I think it cured my girls of wanting to pick the paper off of crayons though.

We put all different colors in a muffin tin... and baked them in the oven at 350 for about 10 minutes.I used a little pumpkin mold from the Dollar Tree for some others. I melted the crayons in a glass measuring cup and poured it in for these.
One think I forgot to do was grease my pans, so I thought I would have a disaster on my hands, but everything came out really easy anyways.
They are big crayons that won't break and the girls like playing with them...mission accomplished.

Fab Clock & Lamp

I'm stiiiill in the process of redoing my girls' room. I'm getting to all of the little things, but just not the bedding (which should be most important, you would think).

I have always wanted to redo a $3 Wal-Mart clock for my nursery, because I couldn't ever find one that was cute and under $20. I never did that, but now have for the girls' room.

Here's what I got...And took it apart and made it look like this...It's really simple to do. Just pop off the top plastic cover. Then carefully yank the hands off of the center...ok, well, pop them gently off so you don't bend them.

I took out the paper part, traced it, cut it out on zebra paper and added letters & a flower cut from my Cricut. Pretty simple.
Although I may go back and put something behind the numbers since they don't show up very well. But I love it anyways.

This lamp I found at a garage sale for $1.Of course it has to match the theme, so I turned it into this...I hot glued fabric on it and then used an old boa I had bought from the Dollar Tree for the girls. And I decided to paint the stem hot pink b/c it ended up being too much white. Again, pretty simple.
That's probably why these things are getting done and not the bedding. :)

Redesigned Coat Hanger

I guess these things are supposed to be coat hangers, purse hangers, or something of the sort. I just wanted something for all of my girls' purses where they could reach them.

This is what I found at the thrift store for 98 cents.Not too exciting, I know. But thought I could do something with it.
Now I love it.I didn't plan the zebra fabric, but it needed something else. It works great for their purses and jackets & coats. I added all of their big coats to it too, so it also has freed up some space in our coat closet, which we needed.And it's kind of behind the door, so it's not the first thing you see when you walk in the room. Nice.

Zebra bookshelf

I am sooo happy at how this turned out. I got this bookshelf off of Craigslist and redid it for my girls' room. I forgot to take a total before picture, but here it is after I primed it...some of the ugliness is still showing.I saw this great idea at Thrifty Decor Chick where she covered corkboard in material and put it in the back of the shelves, and it made such a difference in the bookshelf, so I knew I had to do that. The only difference for me was that when I went to buy corkboard, it was going to be $20! That's about what I paid for the whole bookshelf. Not happening. Maybe it's cheaper at a dollar store though. So I came home and used cardboard. It worked just fine.
Vwa La! You just measure the backs, cut your board and fabric and hot glue it around the edges. Pop it in & beautifullness (that's not really a word, is it).
Of course then I had to put in all the books, not as cute, but I guess I can't leave it empty just because I like the zebra print showing. :)
I just had an idea about what to put in the bottom storage place...I'll share it if it turns out like I have it imagined.

Tea Party

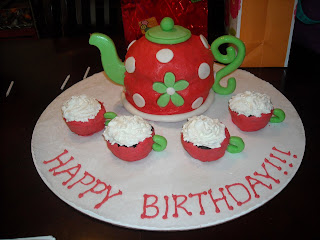
The Tea Party was a success! At least I thought so. This was the cake...before the handle and spout fell off. Of course, I could have left that detail out and you would have never known. But for suggestions when making your own...don't use the homemade marshmallow fondant.

It worked great for the decorations on the teapot, but as my friend had told me, it doesn't hold its shape when you freeze it. Even though it comes out hard as a rock, don't let it fool you. It will slowly start drooping. :P
I made this pinata during the week. The birthday girl helped me out. It made for a fun project and a fun activity at the party...something active besides sipping tea.

The boys wore: top hats I made out of construction paper and old ties.
The girls wore: dress up dresses, easter hats, boas, dress up shoes etc.
We ate: chocolate covered strawberries, grapes, crackers & cheese, watermelon, cake & ice cream
Other junk food: ring pops, candy bracelets & rings, and a pinata full of other candy

It was so much fun to plan and put on. I'm glad my little girl had a great birthday.
Related Posts Plugin for WordPress, Blogger...