V-Day Hair or Anyday Hair

For Valentine's Day we had to do some cute dos for the little girls around my house...those that had hair long enough that is.Honestly, it would be cute on any day.
If you have need of a unique hairstyle simply check out The Story of a Princess and Her Hair.
She has fixed her daughter's hair every way imaginable!
Photobucket

Valentines

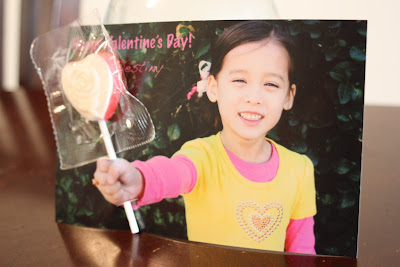
I've literally been waiting A WHOLE YEAR to make these Valentine cards for my girls.
I saw them over on Ucreate last year and knew they would be my little Kindergartener's first class Valentine.Of course I had to do one for my 3 year old too.

It would actually be a good last minute idea also.
I took the pictures and added text in Photoshop. I sent it in online to Sam's and they had my order ready in an hour. I'm sure you can do that other places too.
Cut slits, add the sucker and you're done.

Although one of my favorite details of these are on the back. The sweet handwriting of a 5 & 3 year old.

Happy Valentine's Day!!!

A Vintage Baby Shower

My sweet friend is having her 1st baby anytime now.
So another friend and I threw her a Baby Shower.
This girl loves vintage...loves like it's her personality, her baby's room, her everything it seems. So appropriately we did a vintage inspired Baby Shower.
In an apartment with limited space, I think we pulled it off quite well, if I do say so.Her gluten/dairy free baby bootie cake and cupcakes. For the rest of us, pudding filled chocolate cupcakes...mmmm.

We went with yellows, browns and white. All of the different yellows together actually looked good, I was doubtful at first.I made some banners with my sweet Cricut. Even cut out little hand and footprints. They were precious.They even made it to the water bottles.Here are a couple of things that I got to make her also. A bib and wipie case.
I absolutely love this fabric!
So boy, but so pretty too.
Can't wait to meet this little one!

Baked French Toast

Breakfast for dinner tonight! Can't wait!

I really don't know who to give credit to for this recipe, but it is simply wonderful. I got it from my friend who got it from a friend who's grandma used to make this. So, a big thanks to that grandma...they do always have the best recipes.

Baked French Toast

8 X 8
1 baguette
6 large eggs
1 1/2 cups of milk
1 cup light cream or half and half
4 tsp. sugar
1 tsp vanilla
1/4 tsp cinnamon

Topping:
1/2 cup of brown sugar
1/4 cup butter, softened
1/4 tsp cinnamon
Walnuts optional

or for 9 X 13
1 1/2 baguettes
9 large eggs
2 1/4 cups of milk
1 1/2 cups light cream or half and half
6 tsp sugar
1 1/2 tsp vanilla
1/2 tsp cinnamon

Topping:
1 cup of brown sugar
1/2 cup butter, softened
1/2 tsp. cinnamon

Cut bread into 1/2 inch cubes. Butter your pan. Arrange bread in pan and fill completely. In a bowl combine eggs, both milks, sugar, vanilla and cinnamon. Mix well. Pour over bread cubes. Cover with foil and refrigerate overnight.
(this is before it's cooked)
Next day:
Preheat oven to 350 degrees. In a small bowl mix softenend butter, brown sugar, cinnamon and walnuts if desired. Spread evenly over bread mixture. Bake about 1 hour or until puffed and golden brown. Serve with buttermilk syrup.

Buttermilk Syrup
1 1/2 cups white sugar
3/4 cup buttermilk
1/2 cup butter
2 TBS corn syrup
1 tsp baking soda
2 tsp vanilla

In a medium sized pot, mix sugar, buttermilk, butter, corn syrup, and baking soda. Bring to a boil. Cook for 7 minutes. DO NOT BURN. (Mixture will foam up to 2-3 times in volume. Make sure your pot is large enough.)
Remove from heat.
Stir in vanilla.

It takes a little doing, but well worth it. Enjoy!

Cupcake/Cake Stand

I LOVE all the cute cupcake stands out there, but couldn't bring my thrifty self to spend the money on one. That's like a whole new outfit for me!

So I saw homemade stands out there in blogland that inspired me to make my own.

There are so many variations, but this is what I put together.
I bought 2 pieces of foam board from the Dollar Tree. I cut my platforms the sizes that I wanted (9 1/2", 13 1/2", & 17 1/2" squares) and then made the columns in between out of pieces of the leftover foam board.

To cut the columns like mine, the top one is 4 pieces of 4" x 3", the middle one is 4" x 5 1/2", and the bottom platform holding it all up is 2" x 14".
This was my first to do, so I learned some things in the process. Here are some other ideas to use also.

For the platforms:
*Mod Podge them to match your decor and they would be super cute!
*Add ribbon around the edges...I think this is a must.
*Use 2 thicknesses of cardboard glued together instead of foam board.
*Make them circles or whatever crazy shape you think would be fun.

For the columns:
*Use stirofoam cylinders wrapped in pretty paper.
*Use the containers salt comes in...now I'll never throw away another paper salt container again (my hubby is going to love that).
*If painting, use acrylic instead of spray.
*Paint the pieces before gluing them on if you're worried about what it looks like underneath.
*Make them all the same size, or do different sizes like I did.

This is underneath each one...tried spray paint on the first one.
Next time I'm sure I'll be a little neater about things, but nobody sees underneath anyways.
Wrapping the columns in paper would hide where you glued them together also.I didn't connect all 3 tiers to each other because I wanted to be able to not have to use all 3 tiers. If you want it really sturdy though just hot glue them together.

This is a disposable type of thing, but I'll make mine last until it doesn't look presentable anymore.
Now go fill one up with those beautiful Valentine's Day cupcakes!
Happy Partying! (Even if that's not a word!)

Linking up to Sisters' Stuff & Tea Rose Home!


Related Posts Plugin for WordPress, Blogger...