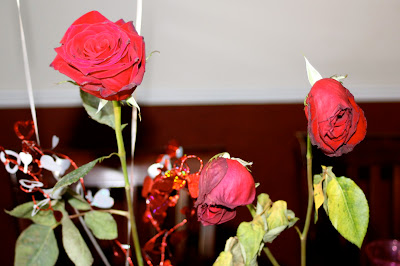
Accidental Experiment

My 3 girls got roses for Valentine's Day.  I was looking at them yesterday and was shocked at how sad 2 of them look, since we got them at the same time from the same place and they started out looking the same.

I had taken one to my 1st grader at school and had fixed it all up in a vase for her.  The other 2 I gave to the girls in their plastic outer wrap and then just stuck them in a big vase afterwards.

What I finally realized was that I had cut the end of the stem on the one I sent to the school, and had forgotten to with the others...therefore, my accidental experiment came about.

This may not be a huge realization to most, but I hadn't ever seen the difference for myself.  And if you haven't either, here it is. 
The one on the left had its stem clipped and the other 2 didn't.
So if you get roses, don't forget to snip the bottom of the stem about an inch up at an angle.  It really does make a difference.

Photobucket

Topiaries

I have always loved the look of topiaries.  I have looked at dozens of pictures of them to see what I really liked.  I knew I wanted to make them...and cheap.  So this is what I came up with.

I went to the wonderful Dollar Tree and bought 2 nerf type balls, a bag of moss and 2 glass vases/bowls.  I already had 2 dowel rods and 2 squares of styrofoam.
I looked for the green moss at the craft stores, but didn't want to spend $7 on it (or even $4 with a coupon for that matter).  I made these Easter baskets a couple of years ago so I thought the same technique might work for this project too.

I put hot glue on the balls and pressed the moss onto it.  The places I didn't get covered well I shot some hot glue and pressed into it a little wad of those messy pieces you get when you're taking the moss out of the bag.
I actually like how they looked just sitting in the vases.  I might have to make some like this as well.
After they were covered I spray painted them green.
You can see really up close they aren't covered completely, but in person you would never know
 I spray painted the vases black and painted the dowel rods brown.

I used scissors to poke a hole in the ball and stuck the dowel rod in until it was sturdy.

I cut my styrofoam to fit and pressed it into the vase until it wouldn't move around.
Then I stuck the other end of the dowel rod into the foam.

I like the kind of messy, but simple look of them.
My mantle is slowly evolving into something I like.

Photobucket

Valentine's Day Cards

I know we've already had Valentine's Day, but thought I would post our Valentine's cards anyways.  We did these last year, but thought we could do the same idea since we're at a new school and we loved this idea.

Also, this was about as last minute as you can get.  V-Day was Tuesday.  Monday morning we took this picture as she was walking out to go to school.

I added the words and hearts in Photoshop and ordered them online at Sam's Club (this is one of those moments that I absolutely loooove technology).  Picked them up on the way to get her from school.  She wrote names on the backs and I put the suckers in that night.
 Done. Whew...cuttin' it close there.
Photobucket

Framed Monogram

I'm trying to decorate about every room in my house right now.  Which means I end up doing a little project here and there before I actually complete a whole room.  They'll eventually all come together.

I love having a fireplace, which gives me an awesome mantel to decorate.  It's been 8 months so I had to start doing something to it, around it, over it, anything.

I broke out all of my old frames I've been saving to re-purpose and had just the right one for this project.  This is the before picture, but I had already taken the matte and picture out of the frame so I sat them together so you get the idea of what it started out as.

I spray painted the frame black and the matte white.
I found some material I liked and wrapped it around the board the picture was on.  I hot glued it on the back to secure it.
Then I spray painted a wooden D black and hot glued it on top of my fabric.
Stuck it all back in the frame, minus the glass, and done.

This was one of the quickest projects I've ever done and I really like how it turned out.

A couple of things I might change on it later...
1) I would put some hot glue under the fabric where the letter is hot glued to it.  Now that it is hanging it is kind of heavy and pulls on the fabric.  You don't really notice it, but I do and it bugs me.

2) I would paint the letter with acrylic paint.  With the wooden letter I got, it doesn't absorb the paint really well and makes it look a little streaked.  Again, I don't think it's that noticeable, but it bugs me.

Happy monogramming. 
Photobucket


Cakes

 I haven't posted some of my cakes & cupcakes I made, so here they are.

Dark chocolate fudge cake with chocolate ganache frosting and cake balls.  It was a tad rich.

Bowling cupcakes for a little boy's birthday party at the bowling alley.


One of the most fun cakes ever to make.  Bachelorette party!


16th Birthday Girl wanted these colors.  Brought us back to the 80's.


I have to show off what my husband was "not crafting" while I did this last cake.
His office was having a Super Bowl competition and he made the trophy for the winner.  It was pretty awesome.
Photobucket

Easy Cinnamon Rolls

My kids love cinnamon rolls and we have them almost every weekend at some time...probably should ease up on 'em a little and do every other week?  Naaaa.

I love homemade cinnamon rolls but they take foooorrrrever.  I wanted something quick (again), so I tried using the canned biscuits.  They turned out great so I've been doing it ever since.

This is how I make them.

Ingredients:
3 cans of cheapo biscuits (10 count) or I'm sure they work with Pillsbury or whatever you want to use.
butter or margarine
cinnamon and sugar mixture - a good ratio is 1/2 cup sugar to 1-2 tsp. cinnamon
powdered sugar
milk

I lay all of my biscuits out overlapping a little.  Using a rolling pin I roll it into about a 11"x14" rectangle.
 I don't measure my butter.  Just spread some all over the biscuits.  Then take your sugar & cinnamon mixture and sprinkle it on top.
Next you will roll it up lengthwise.  After you have it rolled, pinch it closed so it doesn't unroll.
 Get a sharp knife (or you can also use unflavored dental floss) and cut the log into 1 inch rolls.
Make sure to grease your pan first. Then put all of the rolls in touching. 
I bake them at 400 degrees for about 20-25 minutes.  These look more done than what they really were.
To make your icing, put a couple of tablespoons of butter in a bowl and melt it.  Then add a couple tablespoons of milk.  Add powdered sugar and stir until it becomes the consistency you like.  If you need more, just add more milk and then more powdered sugar.
Pour on top of your warm cinnamon rolls and dig in.

*Sidenote: Once I used the flaky Pillsbury biscuits because that's all we had...don't do it!  They turned out pretty bad.

Photobucket
Related Posts Plugin for WordPress, Blogger...