The CUTEST Wonder Woman EVER

I actually finished Halloween costumes early this year!  Amazing.
So I had to share.

My 4 little munchkins are all going as super heroes this year.  I only had to make 2 from scratch, so here is Wonder Woman.
I would say she's the absolute cutest Wonder Woman I've ever seen, just sayin'.
She's showing how Wonder Woman twirls and changes here.  We had to watch some old clips from the original show.  She loved it.

This ended up being so fun to make.
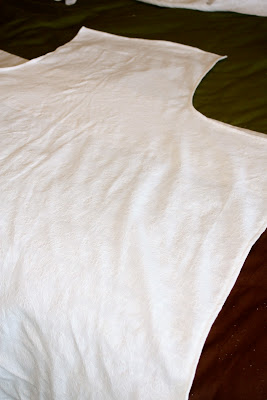
I used an old red t-shirt for the top.  I also made some little shorts to go under the tutu out of some old jersey type pants.  Those same pants are used for the Superman outfit I made my little man...that post will be coming soon.
What I did have to buy was 3 yards of blue tulle and the gold material, which I bought a whole 3 inches of it and had plenty.

My best friend for this Halloween has been heat n' bond iron on adhesive. I used it for the gold on the top and red stars on the crown and cuffs.

I do have one great before and after picture.

I needed red boots, but of course wasn't going to go buy some just for this costume.  So I took some old rain boots and spray painted them.

Here is what they looked like before.

And like you've already seen, here they are for Wonder Woman.
 

Now, why didn't I do that earlier?!  They look so much better.  I will remember this next time our rain boots start looking crummy.

Now we only have to wait a month to wear it...
Photobucket

Framed Wall Decor

Here are some framed things I did awhile back I thought I would share.  

In my oldest girls' room I'm putting lots of framed things above her bed, including this flower wall art.  Here are a couple other things.

Her name framed.
I painted a wood plaque and painted on her name.  I glued it to fabric covered cardboard and put it in a frame I had spray painted.

I read a great tip on transferring images somewhere on Pinterest (one of those things I read, but didn't pin).  Print off your design and put a piece of newspaper between it and your surface.  Make sure the newspaper part has a lot of words.  I used a picture portion of the paper since I didn't have much area to cover.  Then trace your words or design that you printed off with a sharp pencil and it will leave a faint line on your piece of wood.


Another fun thing for her wall, a silhouette.

I took a picture and printed it out the size I wanted and used it as a pattern to cut out of white fabric.  I glued it to the brown and white fabric with spray adhesive and framed it also.

I haven't used spray adhesive until recently when I inherited some, and I love the stuff.  It's so easy for lightweight things.

I had a couple of old frames that I spray painted for our master bedroom.  Here's the before.
After I spray painted them, they hung on my wall empty for awhile.  I finally filled them.
I tend to go ahead and hang them on my wall until I actually decide what I want in them...go figure.
 
Put a painted wooden letter on some fabric covered cardboard in a frame, and there ya go.

I also did the list of dates I've seen everywhere lately.  This was the format I used.

I printed mine out on cardstock and put it in the same brown frame as the monogram.

I also had this big bulky frame.  I think it weighs about 20 pounds.  It's not one of those new "looks like it's heavy" frames, it's the real deal.
Yes, I do love Jesus, but I had to replace this picture.

I spray painted the frame white and put in a picture from our honeymoon.  
I still have so many frames to fill it's ridiculous, but I feel like I'm making some headway at least.

Flower Wall Art

 I've seen these felt flowers all over the place.  I'm trying to find different things to fill frames above my little girls' bed and this was perfect.
I usually buy the individual sheets of felt, but didn't really know how much I would need for this project, so I went to Hobby Lobby and bought it by the yard.  Soooo much cheaper!  I bought 1/3 of a yard for about $1.25 with my coupon (which I figured was about 8 of those smaller individual pieces).

I didn't look at any tutorials (which I can figure out why I didn't think to), but just cut some triangles in different sizes.
I started out by sewing mine all in one long string to make them gather. 
 
 
I laid that string of petals down in a circle and just worked my way inwards with layers of petals.

I used hot glue to put it on my fabric covered cardboard, realizing it probably would have been easy to skip the sewing part.  Guess that's when the reading the tutorials beforehand would have been pretty helpful.
I did find some great tutorials after the fact.
This one has a little different shape to it.

I can't wait to make some pillows with the rest of my felt too.

Now to fill those other 5 frames...

Photobucket

Ruffled Apron

It was my sis-in-laws birthday, and I knew she was wanting a fun apron, so I put this together for her.

I wanted something colorful, and these tie-dyed t-shirts I already had were perfect.
For the main part of the apron I used a tablecloth that had a floral pattern on it.  I used another apron I already had for the pattern, but it's a pretty simple piece if you don't have one on hand.
I cut a couple of 4 inch strips from the bottom of each shirt and sewed them together to get enough for each ruffle.

I hemmed around the edge of the apron and then sewed on each ruffle, starting with the bottom one and then layering them on top of each other.
I added one ruffle at the top edge also.

For the straps I used the t-shirts strips sewn together too.  Best thing about the t-shirts is that you don't have to hem them.  Love that!
She seemed to like it.  It should make cooking so much more fun, right?

I left it long, but you could cut it shorter and it would probably look like a tutu. :)

Photobucket

DIY Magnetic Folders/Whiteboard

It's about that time to start receiving all of those random papers from school.  I never know where to keep them without losing them, but also turn them in on time.

Then one day I saw a lady say something about this thing she has hanging on her fridge for school papers.  This wasn't it exactly, but it looked something like this.

 
I thought that would be perfect, but didn't really want to spend $30 on it.  It also was a little bulky for me.

So I put something together that I think will work for me.  And it was free!  Well, I already had the folders that I bought for 20 cents a piece once upon a time, so that's about as close as you get to free.

I turned folders on their sides with the opening pointed upwards.  I stacked one folder on top of the other scooting it down a few inches and then taped the sides.  Stacked the next one on top and taped all of those sides together...and so on.  I turned them over and put some stick on magnets and that's it.

I stuck some papers in the folders to see how it worked and I think I'm going to like it.  We'll see pretty soon.

Then as I was hanging it on my fridge I got the idea that it might just work as a whiteboard too.  It does!
My folders were the really slick kind, so you would just have to test your own folders out to see if it works.

I already had a calendar on my fridge and thought I could put it on here instead.  I tested it out for a month and realized I liked being able to flip to the other months.  Now I use the front of the folders as a place for notes and randomness.  Either way, it's great!

Photobucket

Crate Seats

I have been looking for a craft table for my kids for awhile, and not just so I could make these seats...or maybe slightly because I wanted to make these seats.
I would give credit to someone, but I've seen so many people making these now that I don't know who to give it to.  Seriously, just Google it and you'll see what I mean.

I figured out the table (which I will show at a later date), and as soon as it was in place, I had to get these seats made.

I bought 6 to make.  I found my milk crates at Wal-Mart for about $3.50.  They had black, grey, red, blue, green, & hot pink.  I had to go with green to match the room I'm putting them in.  Although the pink was so pretty.

Next I went to Home Depot and bought a piece of plywood for $10.  They'll cut it for you, so I had measured mine at home and had them cut 6 pieces for me.  I also took the crate with me to make sure it fit.  I had a ton of plywood leftover.

I had found some new packages of foam at the Goodwill for 99 cents (which was incredible and don't expect that to happen again anytime soon), and cut it to the size of the plywood.  Then I cut my fabric big enough to wrap around it.  
Pull the fabric around the foam and plywood and staple in place.
Put it on your crate and voila.  I love these!  So do my kids.  They are actually the perfect height for my 7 year old and still works well for the little ones too.
 

Oh, and another great thing about these?
 Storage!  Who doesn't need another place to put all of the kids junk.
Photobucket

Flubber Fun


Every time a commercial comes on about flubber, gak, anything gooey like that, my girls beeeg for it.  Like that helps.

We were supposed to be having some tornadoes and storms come through one week, so we bought our ingredients so we could make some while we watched the storms.

This stuff is so cool!  I mean really, what kid wouldn't want some?  The neatest part was to mix it up and watch it turn into flubber.

I got this idea to make bubbles with it, and it was so fun to make these huuuuge bubbles.  I gave the girls straws to use.  They got pretty good at it.
See the tv in the background?  Watching the tornadoes come through.  I think this was right before I had to put all four kids in the bathtub.

Here's the recipe.  I actually only made half the recipe and it was plenty.


Flubber

Mixture 1:
1 ½ cups warm water
2 cups Elmer’s Glue  
Food coloring
 
Mixture 2:
3 tsp. Borax
1 cup Warm Water
Stir mixture 1 together in 1 bowl.

Mixture 2 in another bowl.
 
Make sure both are mixed well.
 
Pour mixture 1 into mixture 2.

You don't even have to really mix it.  After the chemical reaction, just work it around for a few minutes.  It feels really wet at first, but dries up pretty quick.

Then you can bounce it, stretch it, cut it...pretty fun stuff.

Found this on Pinterest...http://frugalfunchallenge.blogspot.com/2011/04/flubber-recipe.html

Fruit Bouquet

What's a birthday without a cake?!  Since I have this love of making fun cakes, I usually do whatever my family wants for their birthdays. Like a castle for my daughter's 3rd, or even an ugly, not creative what-so-ever German Chocolate cake for my husband.

This year my husband has changed what he eats and therefore didn't want a cake at all.  Unheard of.  So I thought he still needed something and surely I could think of something healthy.

That's when I remembered those awesome yummy looking fruit bouquets.  Perfect.

I bought a bunch of fruit: strawberries, apples, kiwis, grapes, a pineapple, & a cantaloupe.  I threw in some marshmallows and chocolate chips just in case someone wanted a little something sweet i.e. the kids or me.
You'll also need skewers, leafy lettuce, stirofoam, and vase/pot/bowl or something to hold it all in.

It was fairly simple.

The cantaloupe:
I sliced this in longer pieces to go vertical on the skewers.  I also cut out little half circles for the center of the pineapple flowers.

The pineapple:
I cut it in slices.  Be careful not to make them too thick, about as thick as the cookie cutter you want to use.  Center your cookie cutter on one of the slices and press firmly.  Stick the skewer straight in the middle of the flower with a little poking out the other side to put the circle of cantaloupe on it, but don't let it stick out of the cantaloupe.  Other shapes like hearts or stars are cute too.

The strawberries:
I dipped some of them in chocolate and others I left plain.  Put them on the end of a skewer.
The grapes:
Slide about 5 grapes on a skewer.  Don't slide the skewer all the way through the last grape, to hide the the point.

I used a big soup bowl I already had to hold it all.  I put a block of stirofoam wrapped in seran wrap in the bottom and laid in the lettuce.  Then I just started sticking the skewers in at different angles.

I ended up not using apples or kiwis.  I thought I had enough for my bouquet without them.

If I do this again, I'll make a more compact bouquet and make sure you can't see the skewers at all.  I think that's what the "professionals" do different than what I did.   They also make the bouquet not quite as tall.

Pretty healthy and very yummy.

Photobucket

Accidental Experiment

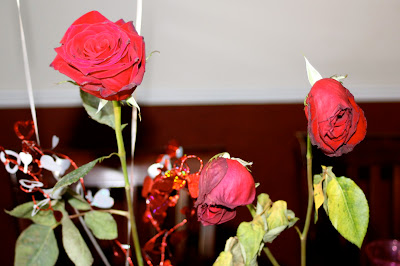
My 3 girls got roses for Valentine's Day.  I was looking at them yesterday and was shocked at how sad 2 of them look, since we got them at the same time from the same place and they started out looking the same.

I had taken one to my 1st grader at school and had fixed it all up in a vase for her.  The other 2 I gave to the girls in their plastic outer wrap and then just stuck them in a big vase afterwards.

What I finally realized was that I had cut the end of the stem on the one I sent to the school, and had forgotten to with the others...therefore, my accidental experiment came about.

This may not be a huge realization to most, but I hadn't ever seen the difference for myself.  And if you haven't either, here it is. 
The one on the left had its stem clipped and the other 2 didn't.
So if you get roses, don't forget to snip the bottom of the stem about an inch up at an angle.  It really does make a difference.

Photobucket

Topiaries

I have always loved the look of topiaries.  I have looked at dozens of pictures of them to see what I really liked.  I knew I wanted to make them...and cheap.  So this is what I came up with.

I went to the wonderful Dollar Tree and bought 2 nerf type balls, a bag of moss and 2 glass vases/bowls.  I already had 2 dowel rods and 2 squares of styrofoam.
I looked for the green moss at the craft stores, but didn't want to spend $7 on it (or even $4 with a coupon for that matter).  I made these Easter baskets a couple of years ago so I thought the same technique might work for this project too.

I put hot glue on the balls and pressed the moss onto it.  The places I didn't get covered well I shot some hot glue and pressed into it a little wad of those messy pieces you get when you're taking the moss out of the bag.
I actually like how they looked just sitting in the vases.  I might have to make some like this as well.
After they were covered I spray painted them green.
You can see really up close they aren't covered completely, but in person you would never know
 I spray painted the vases black and painted the dowel rods brown.

I used scissors to poke a hole in the ball and stuck the dowel rod in until it was sturdy.

I cut my styrofoam to fit and pressed it into the vase until it wouldn't move around.
Then I stuck the other end of the dowel rod into the foam.

I like the kind of messy, but simple look of them.
My mantle is slowly evolving into something I like.

Photobucket

Valentine's Day Cards

I know we've already had Valentine's Day, but thought I would post our Valentine's cards anyways.  We did these last year, but thought we could do the same idea since we're at a new school and we loved this idea.

Also, this was about as last minute as you can get.  V-Day was Tuesday.  Monday morning we took this picture as she was walking out to go to school.

I added the words and hearts in Photoshop and ordered them online at Sam's Club (this is one of those moments that I absolutely loooove technology).  Picked them up on the way to get her from school.  She wrote names on the backs and I put the suckers in that night.
 Done. Whew...cuttin' it close there.
Photobucket
Related Posts Plugin for WordPress, Blogger...